Essential Initial Setup Guide for Ubuntu on AWS EC2 Instances
When setting up a development or testing environment on AWS EC2, starting with the right configurations for your instance is essential. This guide walks you through the initial setup steps for Ubuntu 22.04 LTS, ideal for those utilizing the free tier to keep costs down. We’ll cover the basic configurations without going into services like Route 53, ELB, or RDS, making this guide perfect for straightforward, essential setups. Whether you’re a beginner or an experienced developer, having a well-configured instance can save you time and prevent common issues. This guide ensures your Ubuntu server is set up correctly, allowing you to focus on your projects rather than troubleshooting. From setting up key pairs for secure access to configuring the firewall and storage, we’ve got you covered. Follow these steps to create a stable and efficient environment for your development or testing needs.
When setting up a development or testing environment on Amazon EC2, it’s crucial to configure your instance correctly. This guide will walk you through the initial setup steps for Ubuntu 22.04 LTS. It’s especially useful if you’re using the free tier to keep costs down. We will focus on basic configurations and won’t cover services like Route 53, ELB, or RDS.
1. Basic Server Setup
EC2 Specifications
| EC2 Configuration Item | Setting Value |
|---|---|
| Image (AMI) | Ubuntu Server 22.04 LTS (HVM), SSD Volume Type |
| Instance Type | t2.micro |
| Firewall (Security Group) | launch-wizard-9 |
| Storage (Volumes) | 1 volume - 30GB |
| Key Pair (Login) | Key pair file |
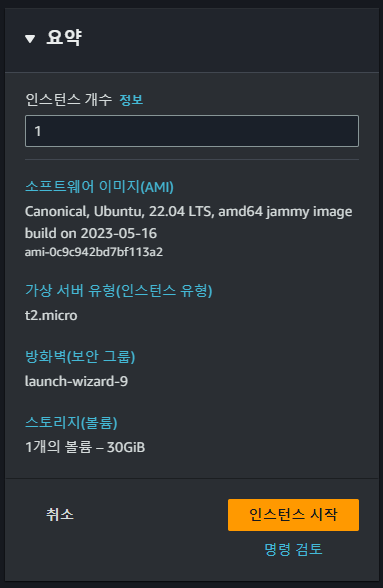
EC2 Specification Settings
For development or testing purposes, high specifications are not required; the free tier model is sufficient.
The launch-wizard-9 security group is the default setting automatically created with the instance. It opens ports necessary for API development, such as 22, 80, and 3306, to all IP addresses.
To enhance security, it is recommended to use a tool like OpenVPN to get a static IP address and configure the security group to allow access only from that IP.
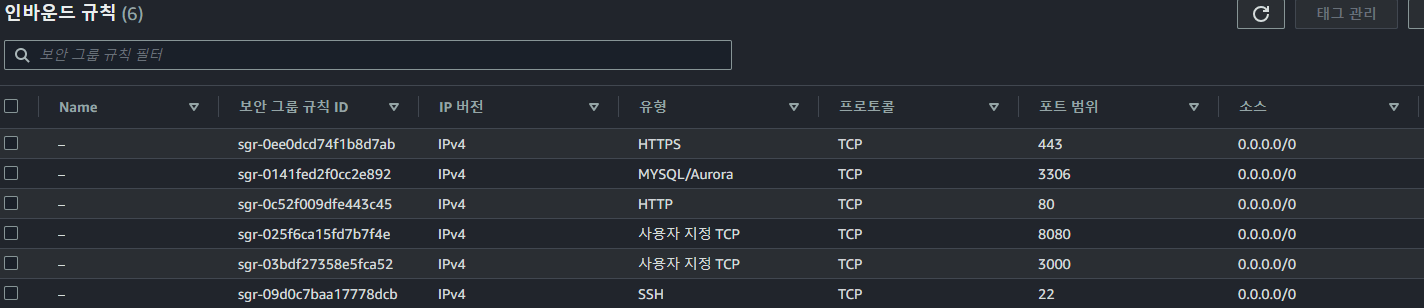
Security Group Inbound Settings
Log in as the ubuntu user, using a key file instead of a password. Using an easy-to-manage client like PuTTY or Termius is convenient.
Download the .ppk or .pem file to log in.
2. Change Hostname
ubuntu@ip-172-0-0-0:~$ sudo hostnamectl set-hostname test
ubuntu@ip-172-0-0-0:~$ sudo reboot

# Hostname change complete
ubuntu@test:~$
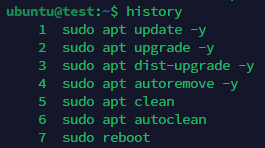
3. Update Ubuntu
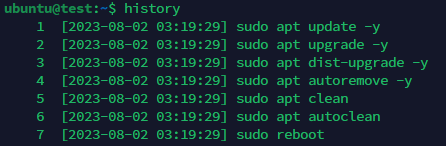
ubuntu@test:~$ sudo apt update
ubuntu@test:~$ sudo apt upgrade
ubuntu@test:~$ sudo apt dist-upgrade
ubuntu@test:~$ sudo apt autoremove
ubuntu@test:~$ sudo apt clean
ubuntu@test:~$ sudo apt autoclean
4. Change History Format
Original history format
# Change history format
ubuntu@test:~$ sudo vi /etc/profile

# Add the following lines to the end of the file
# In VIM, press Shift + G to go to the end of the file
HISTTIMEFORMAT="[%Y-%m-%d %H:%M:%S] "
export HISTTIMEFORMAT
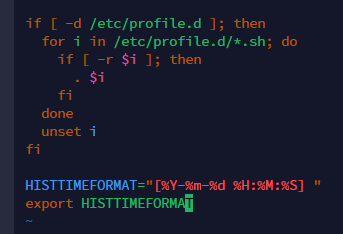
Adding HISTTIMEFORMAT configuration
History format change complete
5. Increase History Cache Size
# Increase history cache size
ubuntu@test:~$ sudo vi /etc/bash.bashrc

# Add the following lines to the end of the file
# In VIM, press Shift + G to go to the end of the file
export HISTSIZE=10000
export HISEFILESIZE=10000
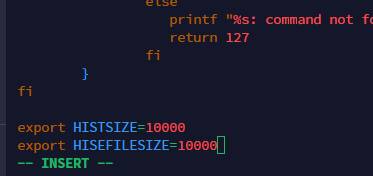
Adding HISTSIZE and HISEFILESIZE configuration
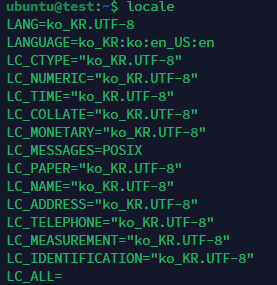
6. Set Locale to Korean
# Check the current locale
ubuntu@test:~$ locale
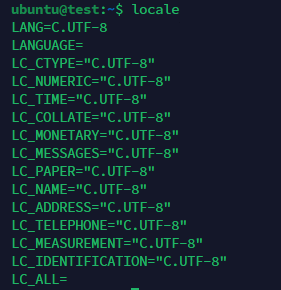
Checking the current locale settings
# Install the Korean language pack
ubuntu@test:~$ sudo apt install language-pack-ko

# Apply the Korean locale
ubuntu@test:~$ sudo update-locale LANG=ko_KR.UTF-8 LANGUAGE="ko_KR:ko:en_US:en" LC_MESSAGES=POSIX

# Apply after reboot
ubuntu@test:~$ sudo reboot
Locale change complete
7. Set Timezone to Seoul
# Check the timezone
ubuntu@test:~$ timedatectl
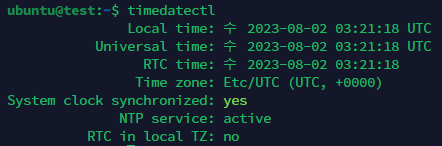
Checking the current timezone settings
# Check if the Seoul timezone exists
ubuntu@test:~$ timedatectl list-timezones | grep Seoul

# Change the timezone to Seoul
ubuntu@test:~$ sudo timedatectl set-timezone Asia/Seoul
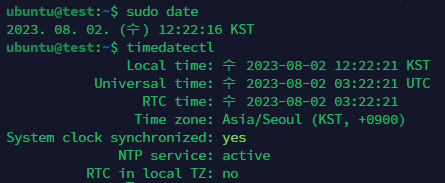
Timezone change complete